In-Depth Hardware Analysis by Tom's Gadget Guide
Expert Hardware Analysis by Tom – Dive Into Gear Details
Create and 3D print QR codes easily. You can convert it into a 3D model and 3D print it. You can create physical objects embedded with the QR code, like keychains, business card holders, Wi-Fi passwords, and even embed them on photo frames, which when scanned, redirect to a personal video. The ideas are endless.
3D-printed QR codes can withstand environmental factors that might damage traditional printed codes, which makes them helpful even for outdoor use. All you need is a reliable FDM 3D printer. Check out ourbest 3D printers for recommendations if you don’t already own one. We will take you through the process of generating the QR code, embedding it into a 3D model, and preparing it for 3D printing. You will also show you how to convert a QR code in 2D image into a 3D model.
Generating the QR Code
Generating the QR Code
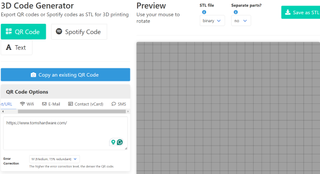
You can use various tools to generate the QR codes; we will use theqrcode2stl in this article. After clicking the link, you can follow the steps below:
1.Select the QR code options : text/URL, Wifi, E-mail, Contact, or SMS. For our case, we shall choose Text/URL and thenenter the website URL .
LATEST VIDEOS FROM tomshardware Tom’s Hardware
(Image credit: Tom’s Hardware)
2.Choose error correction . When the value is higher, the QR code will be denser. In our case, we shall retain the medium value of 15%.
3.Specify 3D model settings , that is, base options like the shape, width, corner radius, and border settings. You can also add custom text and attach a hole to the side of the tag, which you can attach to your keychain by selecting theKeychain box. Specify the QR Code settings like the depth, margin, block size, and Icon.
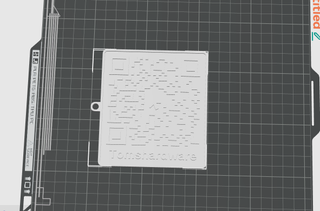
4. After applying the settings,click Generate 3D Model, and it will display in the right section, as shown below.
Stay On the Cutting Edge: Get the Tom’s Hardware Newsletter
Get Tom’s Hardware’s best news and in-depth reviews, straight to your inbox.
Contact me with news and offers from other Future brands Receive email from us on behalf of our trusted partners or sponsors
By submitting your information you agree to theTerms & Conditions andPrivacy Policy and are aged 16 or over.

(Image credit: Tom’s Hardware)
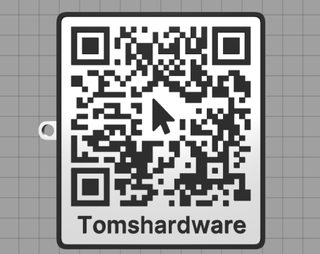
The QR code below was generated after adding a custom text, icon and selecting theKeychain box.
(Image credit: Tom’s Hardware)
6.Download the STL file by clickingSave as STL .
7.Import the STL file to a3D printer slicer of your choice.
If you are using a single-extruder 3D printer and you don’t want the process of painting the file after 3D printing, you will need to change the filament during the 3D printing process. To do this:
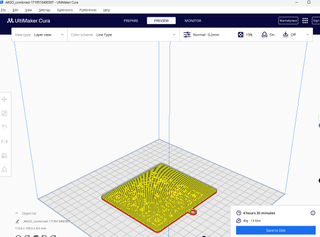
1.Locate the layer when the color changes as you preview the slicing. In my case, it will be at layer 9.
(Image credit: Tom’s Hardware)
2.Install the Modify G-Code extension in Cura. You can find it on Extensions > Post Processing.
3. After installing, go toExtensions > Post Processing >Modify G-Code and then proceed by clickingAdd a script .
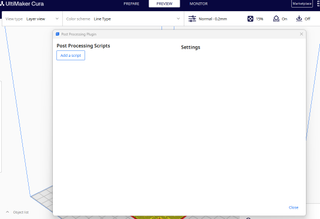
(Image credit: Tom’s Hardware)
4.Select Filament Change , and in theLayer section, set theLayer value from step 1. Mine was 15.
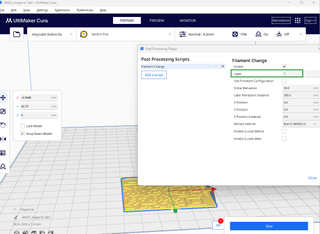
(Image credit: Tom’s Hardware)
5.Re-slice the design and send the G-code to your 3D printer.
The 3D printer will pause when it reaches the layer that you have specified and it will move to the origin of the print bed so that you can swap the filament. In case you don’t have white and black filaments and you have a single extruder 3D printer, you can 3D print as it is.
(Image credit: Tom’s Hardware)
The next step will be to paint the QR code part to distinguish it from the rest of the sections so the camera can pick up the code. You can use a small brush or a black marker pen and must ensure that you do it precisely to avoid distorting the QR code.
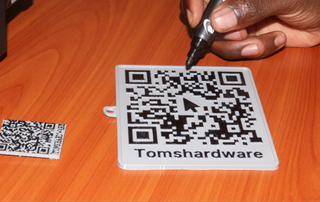
(Image credit: Tom’s Hardware)
Multi-Color 3D Printing QR Codes
Multi-Color 3D Printing QR Codes
If you own a dual-extruder 3D printer, you can customize the colors in your QR code in the slicer before sending it for 3D printing. Follow the steps below to prepare the file for multi-color 3D printingusing Orca slicer .
1.Import the file to Orca slicer by holding and dragging it to the workspace orclick Create new project , then go to where you have stored your file and import it.
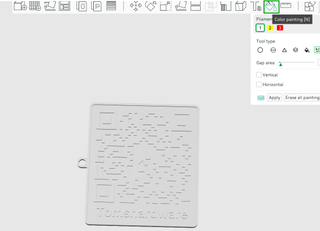
2.Change the color of the STL file to white.
(Image credit: Tom’s Hardware)
2.Click on the file , then go toColor Painting .
(Image credit: Tom’s Hardware)
3.Select the height range option andput the depth value you specified earlier when creating the QR code. For my case, I used the website’s default value, which was 1. Apply on it then change the color of the second filament to black and you will see a design similar to the one shown below
(Image credit: Tom’s Hardware)
4.Slice and send it to your 3D printer.
Converting 2D QR Code to 3D
Converting 2D QR Code to 3D
If you have a 2D QR code that you would like to turn into a 3D model, you can follow the steps below.
1. Let’sgenerate a 2D QR code to use as a sample usingQR Code Generator .

(Image credit: Tom’s Hardware)
When you click Download, you will see an option to download it either in PNG or SVG. We are going to choose SVG.
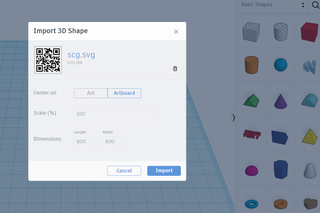
2.Import the SVG file to TinkerCAD . You can also specify the dimensions thenclick Import .
(Image credit: Tom’s Hardware)
TinkerCAD will automatically convert the SVG file into a 3D model.
(Image credit: Tom’s Hardware)
Add the base frame using a cube and then download and import it to your 3D slicer. Besides TinkerCAD, there are many other tools that you can use to convert 2D images to 3D models, such as Blender, Alpha3d, Embossify, and many others.
Creating a QR Code in a 3D Modeling Software
Creating a QR Code in a 3D Modeling Software
The software we will use is TinkerCAD as it has the QR code option. Follow the steps:
- Launch TinkerCAD andclick Create then3D design to create a new project.
2.Locate the QR code generator in theShape Generators section, then place it in the workspace by dragging and dropping it.
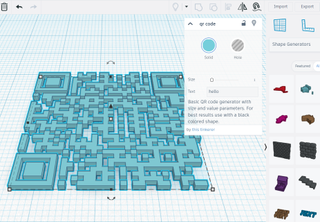
(Image credit: Tom’s Hardware)
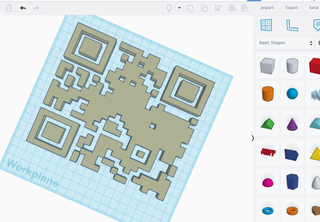
3.Add the link in theText section, and you will see the shape changing.
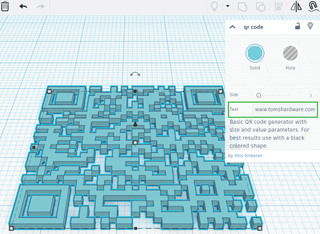
(Image credit: Tom’s Hardware)
4.Add a shape below the QR code to act as the base. You can do this by going to the basic shapes section, then selecting the box option and dragging it to the workspace. You can then resize it so the QR code is well visible.
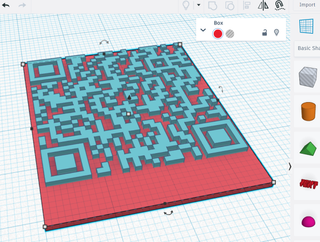
(Image credit: Tom’s Hardware)
Use the align tool to center them correctly.
5.Customize it further by adding the text using the text shape and then resize it.
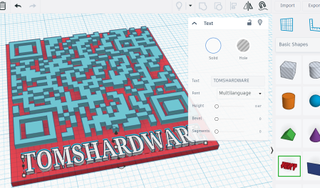
(Image credit: Tom’s Hardware)
6. You canadd a logo to the design by going toImport section and then go to where you have stored it. Ensure that the logo is in SVG format.
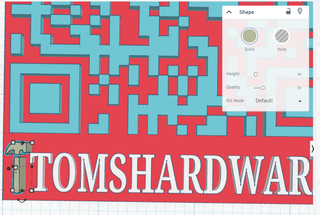
(Image credit: Tom’s Hardware)
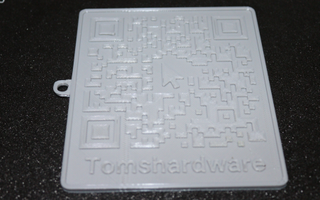
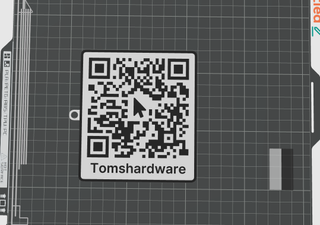
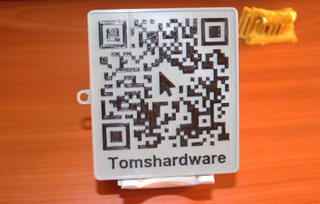
7.Export the file in STL format andslice it . For multi-color 3D printing, you can follow the steps we highlighted above. If you don’t have a dual-extruder 3D printer, you will paint it after 3D printing, most preferably with a white filament. I imported mine to Cura, scaled it before 3D printing, and after painting, I got the design below.
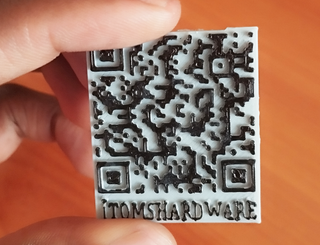
(Image credit: Tom’s Hardware)
Customizing QR Codes
Customizing QR Codes
You can find QR codes online to customize and add the necessary details before 3D printing. An example is theMakerworld QR code generator , which is meant to be 3D printed in Bambu 3D printers, but you can also download and 3D print. To use this option:
1. Once you visit Makerworld website using the link above, it will launch the QR code generator, and you will need tosign up to the platform to start customizing.
2. After signing up,Click the Customize button on the bottom-right section.
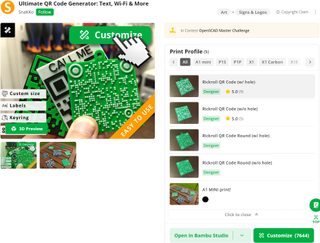
(Image credit: Tom’s Hardware)
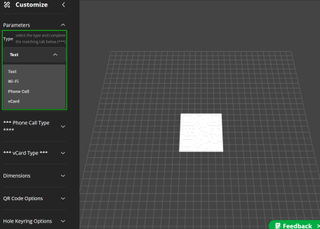
2. In the new window that launches,choose the QR code type you want to create. That is, whether Text, Wi-Fi, phone call, or vCard.
(Image credit: Tom’s Hardware)
3.Click Generate to modify the QR code.
4. You can alsoadjust the dimensions and appearance of the QR code, add other options like a keyring hole or a label, and thenclick Generate .
(Image credit: Tom’s Hardware)
5.Download the file byclicking Download , then import it to your slicing program, and follow the steps we discussed above for dual-extruder 3D printers and swapping filament for the 3D printers that don’t support multi-color 3D printing.
After 3D printing your QR code, it’s also important to 3D print a stand if it will be placed on a flat surface like a table.
(Image credit: Tom’s Hardware)
TheUltimate QR Code Stand in Makerworld is a great option.
MORE: Best 3D Printers
MORE: Best Budget 3D Printers
MORE: Best Resin 3D Printers
Also read:
- [New] 5 Ways to Remove Stickers From a TikTok Video
- [Updated] 2024 Approved Giggle Galore Exploring the Best Tweets on Social Media
- [Updated] In 2024, Comprehensive YouTube Video Editing with FinalCut Pro Skills
- [Updated] Opening Doors to Collective Listening on YouTube
- Conversione Gratuita Online Da MKV a 3GP Con Movavi - Guida Rapida
- Discover the Ultimate Black Friday & Holiday Promotions at Newegg | ZDNET Exclusive List
- Discover the Ultimate List of Best Laptop Deals From HP to Razer: Prime Day Savings Galore | ZDNET Exclusive!
- Experience the Power: A Comprehensive Guide to Using the Baseus 100W Multi-Device Power Bank | GizmoGeek Blog
- Exploring the Lenovo ThinkPad X13s: An In-Depth Look at Its ARM Power, Advanced 5G Capabilities, & Extended Battery Performance - TechReview
- Find the Best Value Computers: Under $1K Cyber Monday Deals at Amazon, Costco, and Dell | ZDNET Insights
- How Can I Catch the Regional Pokémon without Traveling On Apple iPhone 13 mini | Dr.fone
- HP Victus 15 Gaming Laptop Now Available for a Steal at Only $530 From Best Buy - Tech Insights
- Pokemon Go No GPS Signal? Heres Every Possible Solution On Samsung Galaxy S21 FE 5G (2023) | Dr.fone
- Preserve Your Virtual Adventures with Top PC Screen Techniques for 2024
- Simple Steps to Display Your FPS in Counter-Strike: Global Offensive
- Top Recommended USB-C Accessories That Bridge Your Devices to Ultra HD Monitors | Exclusive Tips on ZDNET
- Transitioning to an Ergonomic Split Board: A One-Week Experience that Changed My Outlook on Computer Accessories - Insights From ZDNet
- Understanding the Dynamics of Instagram Unfollows for 2024
- Unleashing Potential: Hyper's Innovative Hubs, Docks & SSD Cases Expand Laptop Capabilities - Insights From ZDNet
- Title: In-Depth Hardware Analysis by Tom's Gadget Guide
- Author: George
- Created at : 2025-01-02 12:32:14
- Updated at : 2025-01-06 01:29:14
- Link: https://hardware-tips.techidaily.com/in-depth-hardware-analysis-by-toms-gadget-guide/
- License: This work is licensed under CC BY-NC-SA 4.0.