QIDI Tech Q1 Pro Assessment - Ignite Your Creativity & Focus!
QIDI Tech Q1 Pro Assessment - Ignite Your Creativity & Focus
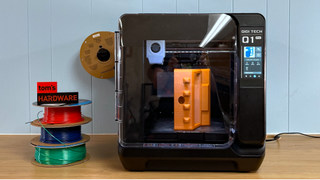
It feels like QIDI Tech has been sitting in the back of the room, taking notes while we discuss other 3D printer’s flaws. The Q1 Pro fixes many of the little problems I’ve had with other machines. It eliminates leveling guesswork by setting its own Z height, the spool holder is side mounted where it’s actually reachable, and it connects easily to your house Wi-Fi without having to play Mother May I with a foreign server. It also uses stock Klipper firmware – a refreshing choice, as too many companies slap a buggy facade on Open Source firmware and try to pass it off as their own.
But it has one controversial feature: a wall powered heater for the build chamber.
The Q1 Pro uses an active heater tucked in the back corner of the enclosure to heat the air as high as 60 C, which is useful for printing ABS, ASA, Nylon and other advanced filaments. The heater is controlled from both the slicer and the printer interface. It is not used for PLA, PETG or other hobby type filaments.
The heater is not marked as hot or hazardous, and if you go poking around the interior with a hex key while the heater is switched on, you could receive an electrical shock. There is a safety grid over the heater, and you’re unlikely to accidentally jam a finger or even the corner of the build plate past the grate (a few Youtubers have tried ). There’s really no reason to poke the heater with a tool while it’s on, if anything because it would be too hot to touch while in operation. QIDI has been made aware of the issue and stated that while their printer is FCC and CE certified, they will implement a more “touch proof” enclosure for future units and make a printable part available to anyone who currently owns a Q1 Pro.
LATEST VIDEOS FROM tomshardware Tom’s Hardware
The QIDI Q1 Pro retails for $599, but is currently on sale for $469, which considering its capabilities and 245 x 245mm build plate is quite a deal. It’s not quite one of thebest 3D printers you can buy, but it’s close.

Specifications: QIDI Q1 Pro
Swipe to scroll horizontally
| Build Volume | 245 x 245 x 240 mm (9.64×9.64×9.44 in) |
|---|---|
| Material | PLA/PETG/TPU/ABS (up to 350 degrees) |
| Extruder Type | Direct drive |
| Nozzle | .4mm (dual metal high flow) |
| Build Platform | Coated steel flex plate, heated |
| Bed Leveling | Automatic |
| Filament Runout Sensor | Yes |
| Connectivity | LAN, WiFi, USB Flash Drive |
| Interface | 4.3 inch Color touch screen |
| Machine Footprint | 477 x 467 x 489 mm (18.7 x 18.3 x 19.2 in) |
| Machine Weight | 17 KG (37.48 lbs) |
Today’s best QIDI Tech Q1 Pro deals
☆ ☆ ☆ ☆ ☆
QIDI Q1 Pro 3D Printer,… ](https://target.georiot.com/Proxy.ashx?tsid=45723&GR%5FURL=https%3A%2F%2Fwww.amazon.com%2FQIDI-High-Speed-Printers-Independent-Detection%2Fdp%2FB0CSDB9QTF%3Ftag%3Dhawk-future-20%26ascsubtag%3Dtomshardware-us-6018455425677296979-20 )
Amazon ](https://target.georiot.com/Proxy.ashx?tsid=45723&GR%5FURL=https%3A%2F%2Fwww.amazon.com%2FQIDI-High-Speed-Printers-Independent-Detection%2Fdp%2FB0CSDB9QTF%3Ftag%3Dhawk-future-20%26ascsubtag%3Dtomshardware-us-6018455425677296979-20 )
We check over 250 million products every day for the best prices
 PearlMountain Image Converter
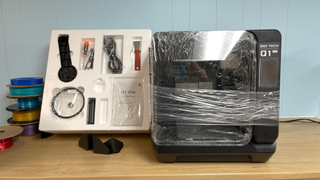
QIDI Q1 Pro : Included in the Box
(Image credit: Tom’s Hardware)
The QIDI Q1 Pro comes with everything you need to get your printer set up. You get tools to maintain the printer, a scraper, and a USB stick. There’s also a small sample coil of black PLA to start your printing journey.
The printer comes with a PDF copy of the manual, a copy of QIDI Slicer and presliced sample model.
Design of the QIDI Q1 Pro
(Image credit: Tom’s Hardware)
The QIDI Q1 Pro is a modern looking, fully-enclosed Core XY printer. It has a steel frame encased in a plastic shell, which makes the printer feel a bit bigger than it really is. The door and top panel are made of clear acrylic, which is prone to static electricity and difficult to keep clean, especially if you have pets that shed. The door lacks a handle, and instead has a graspable lower corner.
It has a removable purge collector in the back, along with a brush for wiping the nozzle, which seems odd on a single color printer. It might be an indicator that QIDI is working on a color upgrade for the Q1 Pro, or it could just be a way to keep the nozzle pristine for more accurate bed probing.


(Image credit: Tom’s Hardware)
Its build plate is 245x245mm with 240mm build height, a size slightly larger than both the Creality K1 and Bambu Lab’s core XY machines. It also has a standard, double-sided textured PEI plate, which doesn’t need glue for ordinary materials like PLA.
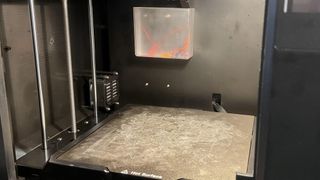
The lid is completely removable to provide air flow for PLA, PETG and TPU. The chamber thermometer averaged 35 degrees while printing with lid off and door closed. Opening the door dropped the temperature another 5 degrees. I should note that the door opens a complete 180 degrees and has hinges that stay put, which keeps the door out of your way should you need to run it wide open.
As previously mentioned, the Q1 Pro has a separate heater for the chamber, located in the bottom left corner. It can boost the interior temperature to 60 C when the lid and door are closed. The heater is powered directly by the wall outlet and should not be touched while running. As with all 3D printers, you should keep your hands clear of the machine’s innards while it’s running. Because this is a high-speed printer, it’s prone to sudden, unpredictable movement. The build plate cannot be jammed past the safety grid (I tried).

(Image credit: Tom’s Hardware)
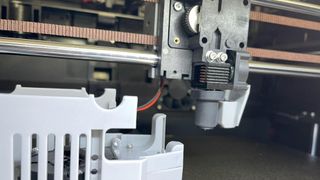
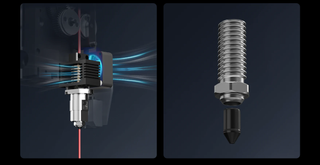
The hotend looks to be inspired by Bambu Lab, but inside the heater cartridge is an ordinary replaceable nozzle. It’s not quite a Volcano, but QIDI uses this size on several printers, which means replacements are readily available on both the QIDI website andAmazon .
A high-flow, wear resistant nozzle, with a copper plated throat and hardened steel tip is installed on the printer. It’s nice to see a 3D printer come with a durable, professional grade nozzle instead of cheap brass. Replacements are affordable, and start at a couple dollars each. They are also much easier to swap out than Bambu-style nozzles.

(Image credit: QIDI)
Another perk included with the Q1 Pro is a built-in 1080p camera for monitoring prints and even doing timelapses. The camera feed pops up immediately when you access the Klipper interface. The chamber is brightly lit with LED lights.

Assembling the QIDI Q1 Pro
(Image credit: Tom’s Hardware)
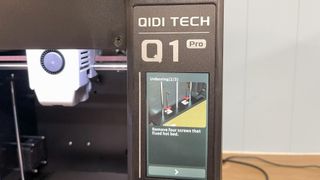
The QIDI Q1 Pro is 98% assembled and only needs to be unboxed and unpacked. You’ll need to remove all the packing foam, unscrew a few shipping screws, and pop on the filament holder.
Leveling the QIDI Q1 Pro
The QIDI Q1 Pro has a full auto leveling program that includes setting the Z height, input shaping and PID tuning with the help of built-in sensors. It runs a full calibration during the set phase. Just push the button and the machine does the rest. The machine also runs through a leveling calibration before each print to make sure that it’s perfect.
Loading Filament on the QIDI Q1 Pro
(Image credit: Tom’s Hardware)
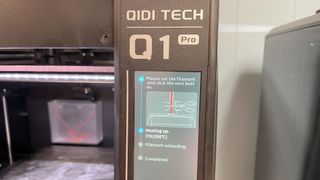
Loading filament is a straightforward process. Just place the filament into the tube near the spool holder and push it through until it bumps against the nozzle. Press the “three lines” button on the bottom of the screen to get to the loading menu, and then press Load. It will warm up the printer and advance the filament.
Most filament can be pushed right up to the gears, where the printer is able to grab it. For TPU, you’ll need to pop the Bowden tube off the extruder and gently hand feed it the last few centimeters.
To remove the filament, you’ll need to press “Replace Filament” from the loading screen. You will be instructed to take the Bowden tube off the top of the extruder and cut the old filament off. It will then warm up the printer and advance the remaining filament forward. Now you can press the load button and add new filament.
It’s unusual that QIDI doesn’t want to back the filament out of the hotend, but it could be that they are trying to avoid clogs by reversing warm filament through the gears.
Preparing Files / Software for QIDI Q1 Pro

(Image credit: Tom’s Hardware)
QIDI included a copy of QIDISlicer, a custom program that is based on Open Source Slic3r. Since Slic3r is the foundation for PrusaSlicer, Bambu Studio and OrcaSlicer, the program will look very familiar to anyone coming from those fan bases.
After QIDISlicer is installed, you’ll have access to an online guide, full of tutorials on how to use the slicer and calibrate the printer. There’s also directions on how to set up the Wi-Fi, which is extremely easy. Simply click the gear icon on the touch screen, click Network, click your Wi-Fi name and then enter the password. The printer will make the connection and then show you the printer’s IP address. The address is entered into the printer settings of QIDISlicer, which allows you to automatically send sliced files over your home network.
The Device tab opens the Klipper interface (Fluidd), where you can see printer information like temperature and speed, all the files in memory, the camera and all the Klipper console commands. This is unhampered stock Klipper, so you are free to tinker with the settings as you like.
The only thing you CANNOT do is access the Fluidd screen directly through your printer’s IP address. You are forced to open QIDISlicer first.
Printing on the QIDI Q1 Pro
The QIDI Q1 Pro comes with a small sample coil of PLA. If you want more colors and materials like silks and multicolor filaments, you should check out our guide to thebest filaments for 3D printing for suggestions.
I ran a Benchy using “speed benchy” rules: 0.25mm layer height, 2 walls, 3 top & bottom layers, 10% infill. I also turned off combing and z hop, and let her rip using the default speed of 300 mm/s. I usedInland’s gray PLA – an everyday filament that is brutally honest in photos.
The Benchy is a bit stringy, but the layers are fairly even, the curves are nice and there’s no ringing. This Benchy printed in an impressive 20 minutes and 18 secs, which isn’t enough to make our top tenfastest 3D printers , but is faster than most. For comparison, an Ender 3 S1 running at its top speed of 100mm/s would take 55 minutes to print this using similar settings.
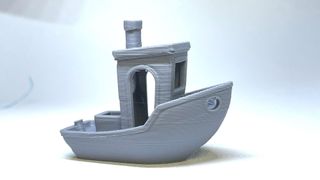
3D Benchy (Image credit: Tom’s Hardware)
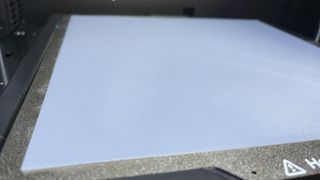
I ran a first layer test by printing a one layer high square that took up the entire buildable area with the Inland Grey PLA. The print was just the tiniest bit high on the right front corner, but was otherwise clean and smooth.
(Image credit: Tom’s Hardware)
I’ve been using the QIDI to make a lot of dragons and eggs, which print with excellent speed and crispness. Here’s a sample dragon egg that I printed with nice 0.2 mm smooth layers. The egg printed in two halves, both on the bed at the same time, and took 3 hours and 21 minutes using QIDISlicer’s default settings. Printed inPolymaker’s Starlight Mercury PLA .
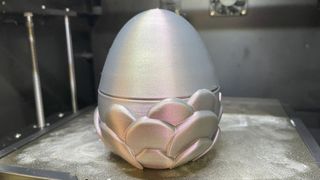
Kaida Egg by Layers in Green (Image credit: Tom’s Hardware)
The Q1 Pro did a decent job with TPU. I printed my favorite phone case with no top layer to let the infill show. It wasn’t able to bridge the holes for the buttons very well, but that’s not unusual with TPU. I used QIDI Slicer’s default TPU settings, and a 0.2mm layer height. This is printed inMatterhackers Translucent Blue Build Series TPU in an hour and 3 minutes.
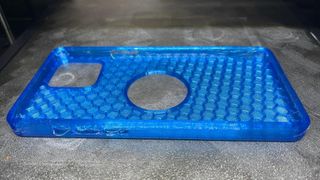
Lopatka’s iPhone 12 Prro Max Case (Image credit: Tom’s Hardware)
I ran parts for an RC car we’re building in ABS, and the Q1 Pro was able to print this material well without any warping or cracking. I used a bit of glue stick on the build plate for insurance. This was printed usingPolymaker Galaxy Orange ABS with a 0.2 layer height and QIDI Print’s default ABS settings. This printed in 23 hours and 4 minutes.
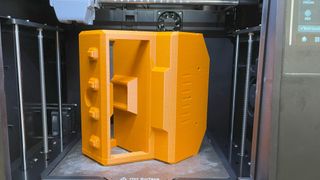
RC Truck Cab, modified from Fixumdude’s Print in Place Pickup Truck (Image credit: Tom’s Hardware)
 Jet Profiler for MySQL, Enterprise Version: Jet Profiler for MySQL is real-time query performance and diagnostics tool for the MySQL database server. Its detailed query information, graphical interface and ease of use makes this a great tool for finding performance bottlenecks in your MySQL databases.
 Bottom Line
The QIDI Q1 Pro is a very good printer that’s simple to set up and easy to use. It makes printing with ABS and nylon worry free. The lack of warning tags on the heater is concerning, so I’m reluctant to recommend it to beginners who may treat it as a household appliance rather than the serious maker tool that it is.
Currently on sale for $469, the Q1 Pro is a reasonably priced, enclosed Core XY printer with many great features. If you want an even bigger 300 x 300mm single color printer Core XY, check out the K1 Max. It’s currently on sale for $719. Our favorite all around printer is theBambu Lab P1S , which can also do four colors when bought as a combo for $949.
MORE: Best 3D Printers
MORE: Best Budget 3D Printers
MORE: Best Resin 3D Printers
QIDI Tech Q1 Pro: Price Comparison
☆ ☆ ☆ ☆ ☆
QIDI Q1 Pro 3D Printer,… ](https://target.georiot.com/Proxy.ashx?tsid=45723&GR%5FURL=https%3A%2F%2Fwww.amazon.com%2FQIDI-High-Speed-Printers-Independent-Detection%2Fdp%2FB0CSDB9QTF%3Ftag%3Dhawk-future-20%26ascsubtag%3Dtomshardware-us-6018455425677296979-20 )
Amazon ](https://target.georiot.com/Proxy.ashx?tsid=45723&GR%5FURL=https%3A%2F%2Fwww.amazon.com%2FQIDI-High-Speed-Printers-Independent-Detection%2Fdp%2FB0CSDB9QTF%3Ftag%3Dhawk-future-20%26ascsubtag%3Dtomshardware-us-6018455425677296979-20 )
We check over 250 million products every day for the best prices
powered by
 Glarysoft File Recovery Pro - Helps to recover your lost file/data, even permanently deleted data.

- Title: QIDI Tech Q1 Pro Assessment - Ignite Your Creativity & Focus!
- Author: George
- Created at : 2024-08-19 03:27:30
- Updated at : 2024-08-20 03:27:30
- Link: https://hardware-tips.techidaily.com/qidi-tech-q1-pro-assessment-ignite-your-creativity-and-focus/
- License: This work is licensed under CC BY-NC-SA 4.0.