Step-by-Step Tutorial: Activating AutoCorrect Feature on Smartphones & Computers
Step-by-Step Tutorial: Activating AutoCorrect Feature on Smartphones & Computers
Quick Links
- Turn On Autocorrect on Android
- Turn On Autocorrect on Windows
- Turn On Autocorrect on iPhone and iPad
- Turn On Autocorrect on Mac
- Turn On Autocorrect in Microsoft Word
Key Takeaways
You can turn on autocorrect on Android using the Keyboard Settings for your specific keyboard. On Windows, iPhone, and iPad, you can find the feature in your Device Settings. On Mac, the feature is located inside System Preferences. In Microsoft Word, activate the feature under “Word Options.”
Autocorrect is an incredible tool that automatically fixes your misspelled words . While the feature comes enabled by default on many devices, you can also turn it on manually. We’ll show you how to do that on Android, Windows, iPhone, iPad, Mac, and Microsoft Word.
Related: How to Use Google Search’s Spell Check Everywhere on Chrome
Turn On Autocorrect on Android
How you enable autocorrect on Android varies by the phone model you use. In most cases, you can find the option in your phone or keyboard settings.
Here, we’ve covered the steps to enable autocorrect on Samsung phones using Samsung Keyboard and Gboard.
Enable Autocorrect on a Samsung Phone
If you use Samsung Keyboard on your Samsung Android phone, you can toggle on the autocorrect feature by following the steps below.
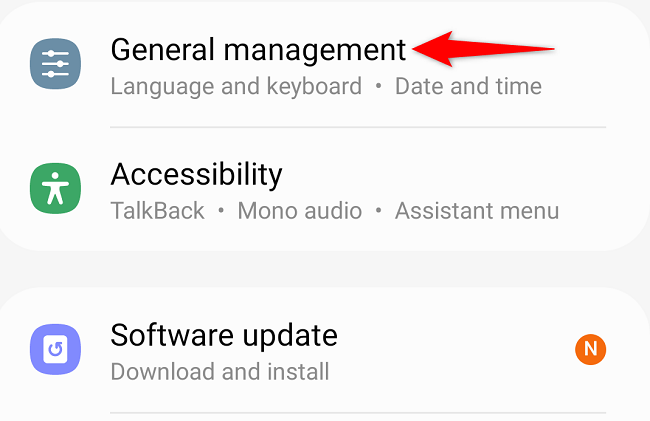
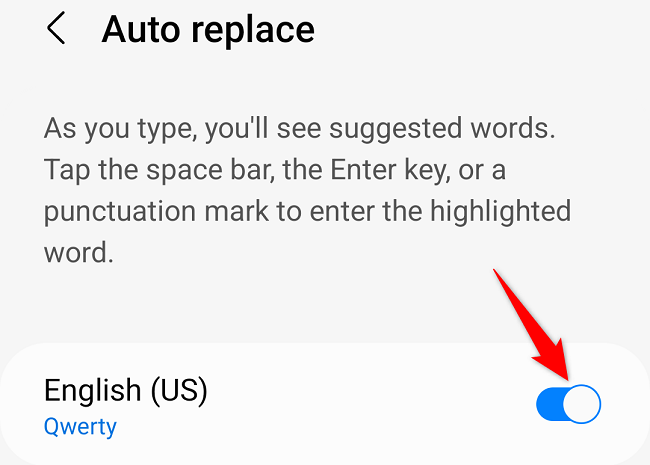
Open Settings on your phone and select “General Management.”
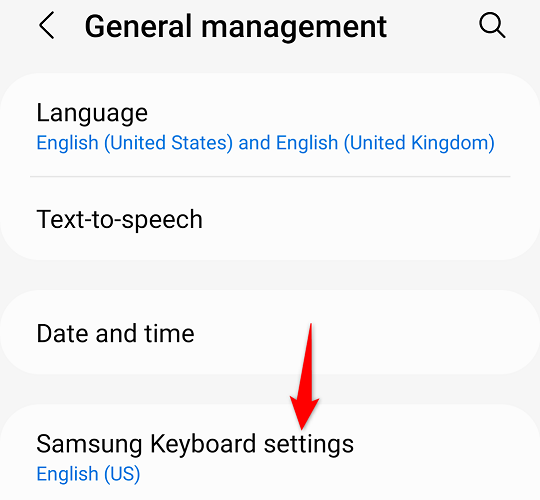
Tap “Samsung Keyboard Settings.”
Choose “Auto Replace.”
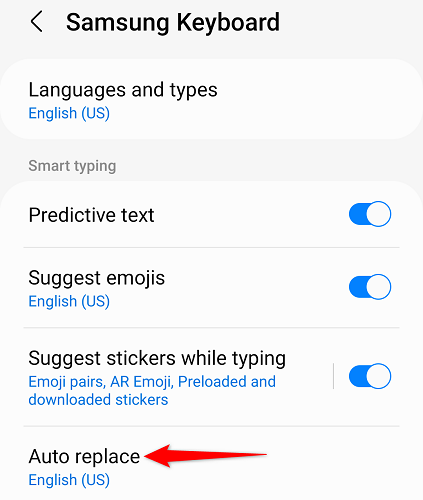
Toggle on the option.
Enable Autocorrect in Gboard
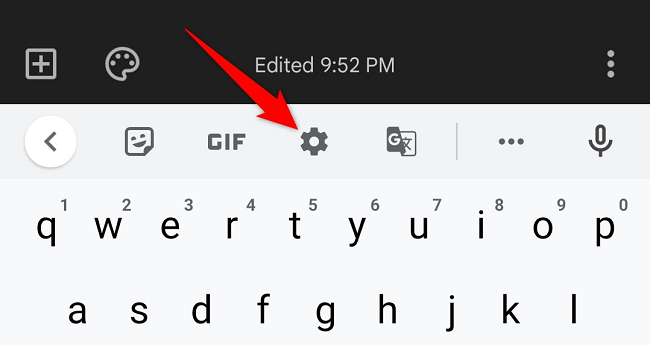
To enable autocorrect in Gboard, tap a text field or text editor to open your keyboard. Then, tap the Gear icon at the top of your open keyboard.
You’ll land on a “Settings” page. Here, select “Text Correction.”
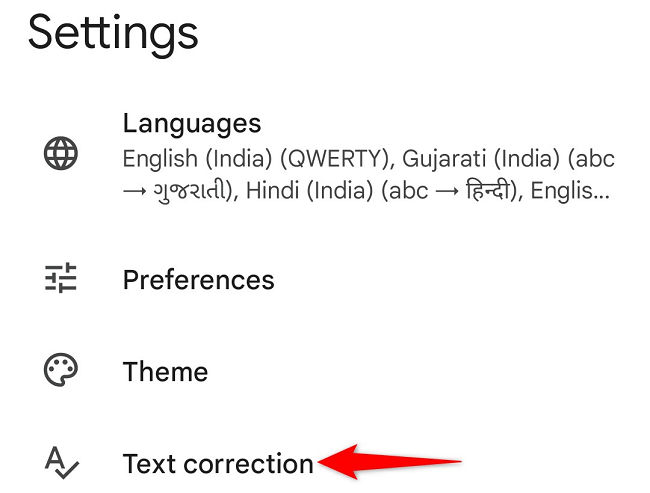
On the “Text Correction” page, toggle on the “Auto-Correction” option.

Related: How to Turn off Autocorrect for Android
Turn On Autocorrect on Windows
Microsoft Windows offers an autocorrect feature , but unlike other devices, it doesn’t work in all apps. You can use the feature in some apps installed from the official Microsoft Store.
To turn it on, launch Settings by pressing Windows+i. Then, select “Devices.”
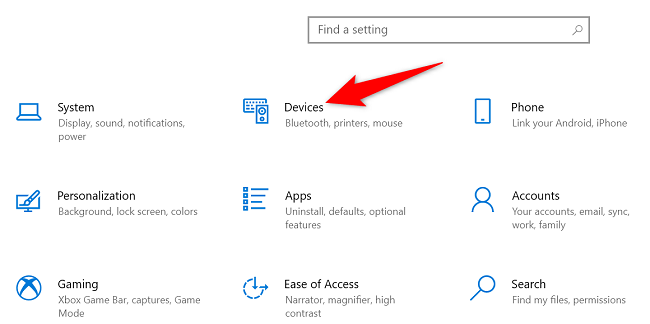
In the sidebar on the left, choose “Typing.” Then, on the right pane, toggle on the “Autocorrect Misspelled Words” option.

Windows will now fix typos in your texts in supported apps.
Related: How To Disable Autocorrect in Windows 10
Turn On Autocorrect on iPhone and iPad
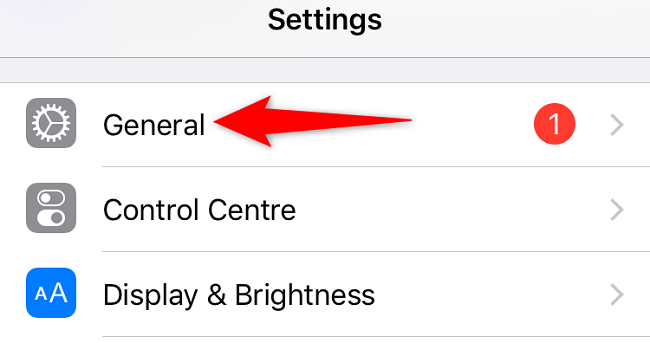
To activate your iPhone or iPad’s autocorrect feature , launch Settings on your phone.
In Settings, select “General.”
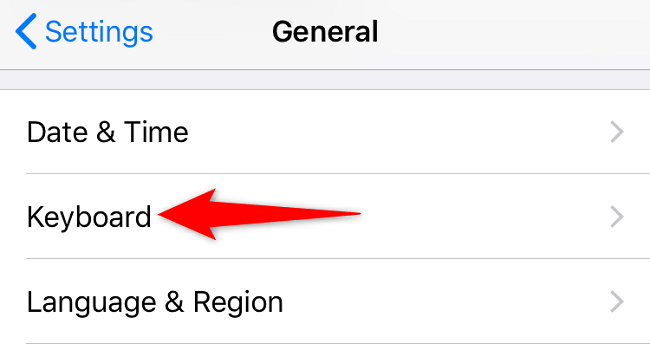
On the “General” page, choose “Keyboard.”
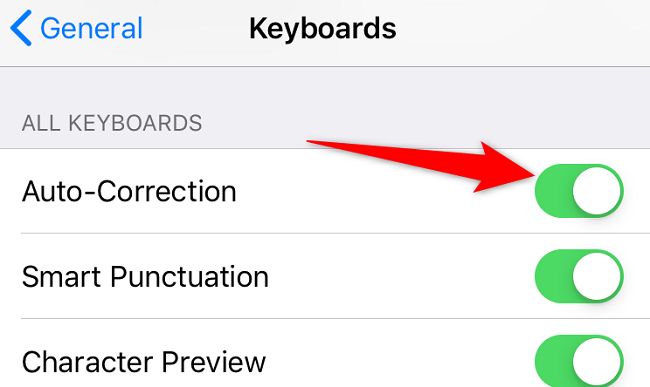
On the “Keyboards” screen, toggle on “Auto-Correction.”
Related: How to Make iPhone AutoCorrect Ducking Let You Swear
Turn On Autocorrect on Mac
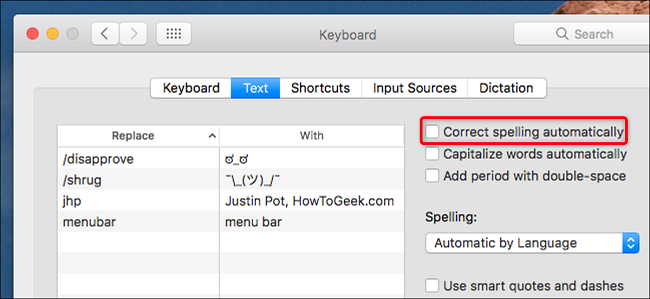
Mac also offers an autocorrect feature to help you fix spelling errors.
To enable that feature, head into Apple Menu > System Preferences > Keyboard > Text. Then, turn on “Correct Spelling Automatically.”
Related: How to Disable or Customize Autocorrect on Mac
Turn On Autocorrect in Microsoft Word
Microsoft Word has its own autocorrect feature to help you fix all the typos in your documents .
Related: How to Spell Check With Keyboard Shortcuts in Microsoft Word
To turn it on, launch Word and select “Options” in the left sidebar.

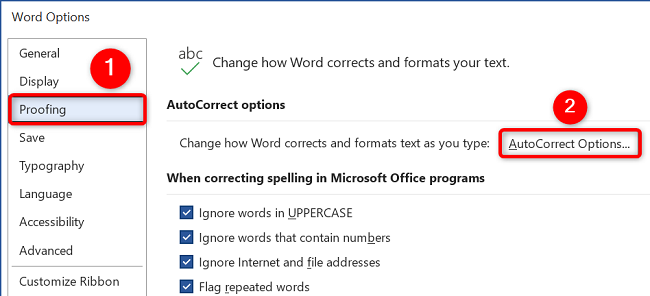
In the “Word Options” window’s left sidebar, click “Proofing.” Then, on the right pane, choose “AutoCorrect Options.”
In the window that opens, select the “AutoCorrect” tab. Then, enable the “Replace Text As You Type” option.
Finally, click “OK” at the bottom.

Choose “OK” on the “Word Options” window.
That’s it! Autocorrect should now be enabled on your various devices. While you’re at it, you might want to learn how to type faster on your smartphone’s touch keyboard .
Related: 5 Ways to Type Faster on Your Smartphone’s Touch Keyboard
Also read:
- [New] 2024 Approved Alternatives to Google's AR Interactive Graphics
- [New] 2024 Approved Step Up Your Storytelling Effortless Text Addition for Video Clips with Photos
- [New] Mastering Media Importer Strategies in Windows 10
- [Updated] Best Practices Choosing Exceptional Cloud Services
- Can Lenovo's Revolutionary Yoga Book Grokkende: De Nieuwe Wereld Van Gaming Consoles
- Chromebook Nightmare: Repeatedly Troubled by Bedbug Infestations in School Computers | ZDNet
- Compact Yet Powerful: Discovering the Ultimate Multi-Functional Chromebook Reviewed on ZDNet
- Discover Potential Savings: Why Inspecting DVDs Before Going Digital Could Reward You With Coupons
- Experience 3D Art on Asus Latest Laptop Models Without Needing VR or AR Spectacles - Insights for Tech Enthusiasts
- How to Find iSpoofer Pro Activation Key On Infinix Note 30 5G? | Dr.fone
- How to Track Xiaomi Redmi Note 12 Pro 5G Location without Installing Software? | Dr.fone
- Top-Rated Digital Notepads on the Market: Comprehensive Reviews & Buyer's Guide - Insights
- Ultra HD 4K Display BenQ SW320 Review
- Unlock Your Tecno Phantom V Flips Potential The Top 20 Lock Screen Apps You Need to Try
- ZDNet's Expertly Curated Selection: Ultimate Tech Gadgets and Devices for the Year 2E
- Title: Step-by-Step Tutorial: Activating AutoCorrect Feature on Smartphones & Computers
- Author: George
- Created at : 2024-12-23 20:42:46
- Updated at : 2024-12-27 22:49:56
- Link: https://hardware-tips.techidaily.com/step-by-step-tutorial-activating-autocorrect-feature-on-smartphones-and-computers/
- License: This work is licensed under CC BY-NC-SA 4.0.