Steps to Rectify Problems Caused by Grinding of 3D Printing Material
Master the Art of Flawless 3D Printing: No More Blisters or Pimples
Blobs are excessive deposits of melted filament that appear as small and irregular protrusions on the print’s surface. It occurs mainly when the extruder deposits more material than necessary at specific points due to factors like inconsistent extrusion, incorrect retraction settings, and or insufficient cooling. Zits, on the other hand, are tiny imperfections that look like scars on the surface of a 3D print, and they can also come as a result of inconsistent extrusion, changes in 3D print speed, and variations in cooling, even if you’re using one of thebest 3D printers . Zits are generally smaller than blobs, but they still compromise the overall look of the print and affect the print’s surface finish. You can fix these issues by implementing the following strategies.
1. Ensure There is Proper Cooling of the Layers
If the layers are overheated due to poor cooling, the excess melted filament will form the blobs on the printed object. You need to optimize the cooling settings to be consistent on all the sections of your 3D print.
It’s also advisable to increase the fan’s speed to prevent overheating of the layers before the next ones are deposited, which leads to excess melted filament, which later forms blobs on the object.
2. Optimize Retraction Settings
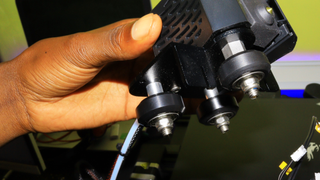
Retraction plays an essential role in pulling the filament back slightly when the nozzle is not moving between different locations. This helps prevent oozing which can result in blobs and other issues likestringing in 3D prints .
When adjusting the retraction, you need to consider the retraction speed which determines how quickly the filament is retracted back and the retraction distance, which determines the amount of filament pulled back to the nozzle. When the retraction settings are inadequate, small bumps can occur because of the pressure variations on the extruder when the nozzle is not extruding, especially when moving on the empty spaces, leaving behind filament due to oozing. So you need to experiment and get the perfect retraction distance and speed to prevent unwanted material residuals from being deposited on the surface of the print.
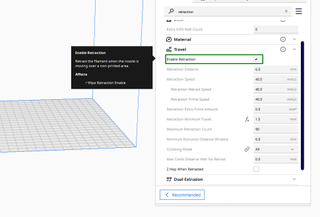
The standard retraction distance is usually around 2 to 7 mm, and the speed ranges from 30 to 60 mm/s. You can find these settings on your 3D printer slicer. For example, in Cura, you have to ensure that you check theEnable Retraction box.
(Image credit: Tom’s Hardware)
As you make the adjustments, you can also 3D print aretraction test model and use it to adjust the settings until you achieve the sweet spot.
Stay On the Cutting Edge: Get the Tom’s Hardware Newsletter
Get Tom’s Hardware’s best news and in-depth reviews, straight to your inbox.
Contact me with news and offers from other Future brands Receive email from us on behalf of our trusted partners or sponsors
By submitting your information you agree to theTerms & Conditions andPrivacy Policy and are aged 16 or over.
(Image credit: Tom’s Hardware)
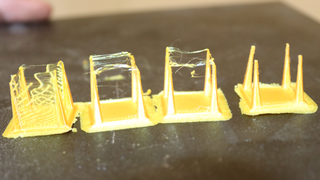
You can begin with a lower retraction distance, like 2mm, print the model, and then check how it appears. It might have strings and other imperfections, and you can continue increasing by 0.5mm until you see improvement. You can then shift to retraction speed and start with a lower value, like 30 mm/s, and increase it gradually as you observe how the prints appear until you find the optimal value.
3. Use Coasting
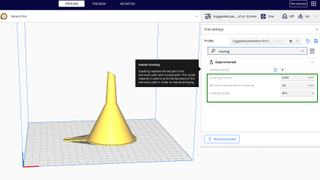
When you activate coasting settings, it stops the extruding filament slightly before the end of the path when the nozzle is about to travel over an area without printing. This is helpful as it minimizes the pressure build-up in the nozzle, which causes the filament to ooze out and turn into blobs or zits. You can find the coasting setting in theExperimental section, and check theEnable coasting box to activate it.

(Image credit: Tom’s Hardware)
When you enable it, other settings appear, likeCoasting Volume ,Minimum Volume Before Coasting , andCoasting Speed .
(Image credit: Tom’s Hardware)
Coasting volume is the amount or size of the material that is not extruded at the end of each layer. You need to find the appropriate value because if it’s too high, the printer might not extrude enough filament, resulting in under-extrusion.
If it’s too low, there will be a build-up of pressure on the nozzle, so you need to tweak it until you get the correct value. The default value is around 0.064mm³. To get the correct value, multiply the nozzle width, layer height, and length at a certain height. For example, if the nozzle width is 0.4mm, layer height is 0.2mm, and an extrusion path is around 0.8, when you multiply them, you will get 0.064. You can increase in small increments until you find the appropriate value.
Minimum Volume Before Coasting refers to the minimum material size that should be there for the slicer to apply coasting. The default value is around 0.8mm³, which works great for most prints.Coasting speed on the other hand is the speed at which the nozzle moves when it is coasting. It’s usually relative to the printing speed, and using a slightly lower value than 100%, like 90% is advisable.
As you enable coasting to eliminate blobs and zits, you need to remember that its effectiveness depends on the geometry of your 3D model, 3D printing speed, and the type of filament you are using. So you need to tweak the settings until you achieve the best results.
4. Adjust 3D printing Speed and Temperature
Adjusting how fast your 3D printer prints as well as the temperature you are using can also help fix the issue as these settings influence the extrusion rate and the cooling time for the layers. A higher 3D printing speed than necessary can result in increased pressure in the nozzle, which can cause the excess filament to ooze out, causing issues on the print as the nozzle moves.
The standard speed is usually between 50-60 mm/s, and anything above this can result in problems. If the temperature is too high, the filament can become too fluid and start oozing out. Alternatively, if it is too low, there can be incomplete melting which results in uneven extrusion which causes irregularities and inconsistencies in the printed layers. You must adjust the temperature until you find the perfect settings for your filament and printer.
5. Disable Power Recovery Feature
If none of the above options don’t work, you should consider turning off the power recovery option if it’s turned on. Even though this feature helps save your 3D print instead of starting to print from scratch in case of power interruption, it can introduce blobs. This is because when the feature is activated, the 3D printers utilize the SD card to write “check-points” or the print job state to the card, which will help in resuming the print and this might start competing with the standard printing operation, resulting in blobs.
Turning this feature on is not easy as not all thebest 3D printers have that option on the menu, and you need to use the SD card. Luckily, a YouTuber, Geek Detour, createdG-code files for enabling and disabling power recovery and you can download and save them to your SD card and use them. You can also choose to buy a UPS battery to address power challenges if you don’t want the challenge of your print being affected due to power loss.
Related 3D PrintingTutorials
More: 5 Ways Fix Z Banding in 3D Printing
More: How to Use FreeCAD for 3D Printing
More: How to Convert OBJ Files to STL Files for 3D Printing
More: How to Use PrusaSlicer: A Beginners Guide
Also read:
- 2024 Approved Quick Tips for Creating and Editing Snapchat Duos
- 2024 Approved Step up to Stardom 10 Pro Tips for Pixlr Excellence
- Automate Your Furry Friend’s Diet Using Arf Smart Pet Feeders
- Discover the Ultimate Selection of Dell Deals for Black Friday/Cyber Monday at Major Online and In-Store Outlets | ZDNET
- Exclusive Offer Alert: Slash $250 Off Acer Nitro 5 Gaming Rig – Shop Now!
- Exclusive Pre-Prime Day Bargains at Best Buy - Insider Tips
- In 2024, 5 Techniques to Transfer Data from Xiaomi 14 to iPhone 15/14/13/12 | Dr.fone
- Intel's Breakthrough Innovation: Meet the New Generation of Granite Rapids Chips, Boasting a Staggering 128 Cores and an Impressive #500W TDP Rating
- M3 Macbook Pro Upgrade: Experience Seamless Multi-Display Support Just as the Air Version!
- MOV playback issues on Samsung
- Navigating the Complexities of macOS SRT Changes for 2024
- Pixel Perfection Combining Computer Photos for 2024
- Recuperar La Carpeta De Escritorio Desaparecida en El Perfil De Usuario Con Soluciones Probadas Y Verdaderas
- Revolutionary Refresh: How Apple Covertly Enhanced Last Year's 13-Inch MacBook Pro for Future Success
- Revolutionizing Creative Workflows: Comprehensive Guide to the Latest 2023 Apple M2 Max MacBook Pro (16) - Expert Review
- Unbeatable Prime Day Offers for Gamers Awaiting You in October 2Ebe! | ZDNet
- ZDNet Explores Outstanding 2-in-1 Gadget of the Year and Its Overlooked Office Advantage Feature
- Title: Steps to Rectify Problems Caused by Grinding of 3D Printing Material
- Author: George
- Created at : 2024-12-29 17:12:29
- Updated at : 2025-01-06 06:25:58
- Link: https://hardware-tips.techidaily.com/steps-to-rectify-problems-caused-by-grinding-of-3d-printing-material/
- License: This work is licensed under CC BY-NC-SA 4.0.