The Ultimate Guide to Perfect, Blemish-Free 3D Printing Results
Achieving Perfectly Sealed 3D Prints: How to Avoid Common Hole and Gap Issues
One of the issues 3D printer hobbyists face is holes and gaps in 3D prints. These issues can occur in any 3D print (even on thebest 3D Printers ) and they compromise the print’s structural integrity and overall strength and usually appear as small cracks on the print’s surface. Sometimes, they appear as more profound weaknesses that distort the intended geometry accuracy, which can lead to mechanical failure, especially for the functional prints or prototypes, more so in areas where precision and reliability are crucial.
As with other 3D printing problems, you need to understand the root cause to know how to address it. Different types of holes and gaps can appear on the print based on the location, size, and structure, and we will look at the main ones and how to solve them.

1. Holes and Gaps on the Top Section of the Print
 OtsAV TV Webcaster
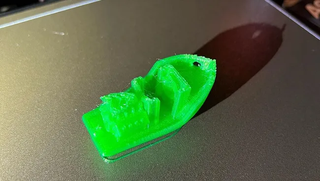
(Image credit: Eliteprint3d)
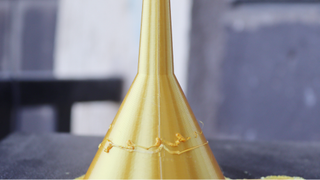
Holes and gaps on the top section of your 3D print can quickly be noticed and are usually characterized by hollow or sunken areas on the top surfaces. They typically occur during the cooling phase of the 3D printing process, and the deposited layers retract or shrink, leaving voids behind on the top surfaces. They can also occur when there is no sufficient top-layer infill. You can fix these by increasing the top layer thickness so that more material is deposited to create a more solid surface.
(Image credit: Tom’s Hardware)
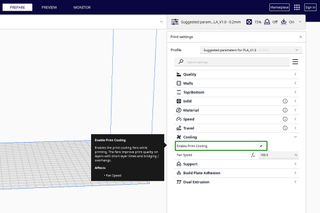
As you increase it, you also need to check theinfill patterns and ensure that you use one that is not susceptible to pillowing, like gyroid and honeycomb. Adjusting cooling to ensure the layers have enough time to cool is vital. You can adjust the fan speed in the3D printer slicer and ensure it works as required.

(Image credit: Tom’s Hardware)
When the uppermost layers of the print do not have sufficient support or material to form a solid surface, the deposited filament may retract or shrink, leaving behind voids that manifest as holes or depressions.
2. Tiny Holes in the Walls of the 3D Print

(Image credit: Tom’s Hardware)
Tiny holes or gaps on the walls can be caused byunder-extrusion issues due to the printer not extruding enough filament, especially when it passes through complex geometries. It can also be caused by inconsistent layer adhesion, maybe because of a clogged nozzle, inconsistent diameter, or improper printer calibration. To address this issue, you must check your 3D printer and ensure that the nozzle is not clogged by regularly cleaning it. You must also check the extruder and ensure it is well-calibrated and other components like the gear system are working as expected. Additionally, adjusting the flow rate compensation, temperature, and speed can address under-extrusion issues, and you can find those settings in your slicer.
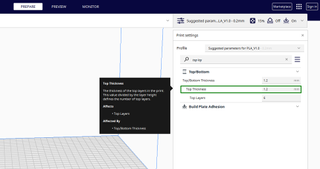
If the gaps appear because of the printer struggling to print thin walls, you need to activate thePrint Thin Walls setting in Cura Slicer (if it’s the one you are using) orDetect Thin Walls if you areusing PrusaSlicer . The printer can struggle to deposit filament on the specific areas intended in the print if the horizontal walls of the design are thinner than the diameter of the nozzle. When you activate that feature, the slicer optimizes the extrusion flow for thin walls to ensure more accurate filament deposition.
Stay On the Cutting Edge: Get the Tom’s Hardware Newsletter
Get Tom’s Hardware’s best news and in-depth reviews, straight to your inbox.
Contact me with news and offers from other Future brands Receive email from us on behalf of our trusted partners or sponsors
By submitting your information you agree to theTerms & Conditions andPrivacy Policy and are aged 16 or over.
In Cura, you can find it in theWalls section. You can select the box forPrint Thin Walls .
 Epubor Audible Converter for Win: Download and convert Audible AAXC/AA/AAX to MP3 with 100% original quality preserved.
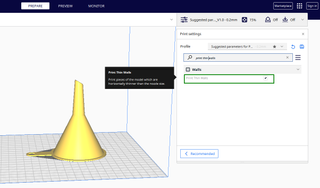
(Image credit: Tom’s Hardware)
3. Large Gaps that Result in Layer Separation
When the layers fail to adhere correctly to each other, they can start separating, resulting in visible gaps and cracks and the print becomes weak and you can pull the layers apart. One leading cause of this issue is inadequate layer adhesion due to insufficient nozzle temperature or improper bed adhesion.
To solve this issue, you need to optimize the temperature settings to ensure they are consistent and you need to experiment with different ranges depending on the filament and printer you are using until you achieve the optimal value. You can also 3D print atemperature tower and use it to experiment with different temperatures until you find the appropriate value.
You also have to ensure that the bed temperature is set correctly for the specific filament you use to provide a stable foundation for the first layers which helps overall adhesion. Layers cooling at different rates can also cause layer separation especially at the edges. So you need to adjust the cooling settings of the fan so that there is proper cooling of the layers.
Adjusting the flow rate is essential as it helps to ensure that the quantity and thickness of the filament extruded from the nozzle are consistent. When the flow rate is set too low, it results in under-extrusion as insufficient filament will be extruded, leading to noticeable gaps.
You can 3D print aflow calibration cube and use it to find the optimal value. You must also lower the layer height (the distance between each layer deposited). The default value is usually 0.2mm. Slowing down the 3D printing speed can also help fix the issue, as it allows for better deposition and improved bonding between the layers. In addition to adjusting those settings, you also need to ensure that the filament you are using is dry as moisture in the filament can cause pressure build-up in the nozzle. When extruded, it might not come out as intended, and this brings problems. You need also to ensure that it has a consistent diameter all through.
4. Gaps in the First Few Layers of the 3D Print
Gaps in the initial layers of your print can be as a result of an improperly leveled print bed. If the distance between the nozzle and the bed is uneven, it can contribute to the gaps. If it is too close to the bed, for example, it may compress the filament affecting the smooth flow and leading to gaps as the material struggles to extrude.
Alternatively, the filament might not adhere adequately to the surface if the nozzle is too far from the bed. These variations in the nozzle and bed distance can disrupt the uniformity of the initial layers. To address this, you need to properly level your 3D printer bed and ensure the Z offset is set correctly.
You canmanually level your 3D printer bed or use the automatic bed leveling feature found in most of the best3D printers . You cancorrectly set the Z offset of your 3D printer manually by adjusting the nozzle height as you place a piece of paper on the bed. You can find the Z offset setting on the menu of your 3D printer.

(Image credit: Tom’s Hardware)

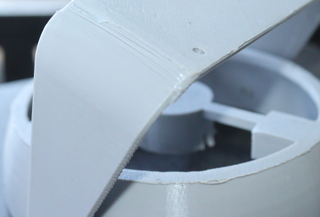
5. Holes and Gaps in the Corners of the Print
(Image credit: Tom’s Hardware)
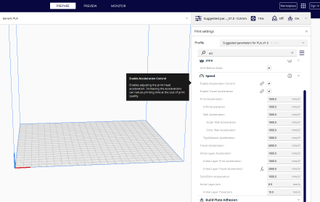
3D printers usually face challenges when printing corners, especially those that are sharp because the extruder needs to change direction and accelerate within a short time when it comes across those areas. There can be a build up of pressure on the extruder as the printer navigates through the corners which can lead to variations in extrusion, more so when printing at high speeds. To fix this, you need to start by adjusting the acceleration and jerk settings to ensure that the extruder can smoothly transition between different directions without introducing excessive vibrations.
(Image credit: Tom’s Hardware)
In addition to jerk and acceleration settings, you also need to slow down the printing speed for the printer to manage the abrupt changes in the direction better when it approaches the sharp corners. Fine-tuning the retraction settings can also minimize the issues like blobs andstringing in 3D prints that can result in gaps in the corners in severe cases.
The above strategies can help address issues related to holes and gaps in your 3D prints. If you have a print that has suffered from these problems, you can salvage it through post-processing activities. One approach is to apply filler material likeBondo orMilliput to the areas with gaps or holes to refine the appearance and structural integrity. Other strategies like applying acetone vapor smoothing and painting can also help achieve a smoother surface, even though it might not work on all prints.

Related 3D PrintingTutorials
More: 5 Ways Fix Z Banding in 3D Printing
More: How to Use FreeCAD for 3D Printing
- Title: The Ultimate Guide to Perfect, Blemish-Free 3D Printing Results
- Author: George
- Created at : 2024-08-19 02:59:32
- Updated at : 2024-08-20 02:59:32
- Link: https://hardware-tips.techidaily.com/the-ultimate-guide-to-perfect-blemish-free-3d-printing-results/
- License: This work is licensed under CC BY-NC-SA 4.0.