Unveiling Gadgets with Tom - Expert Hardware Reviews
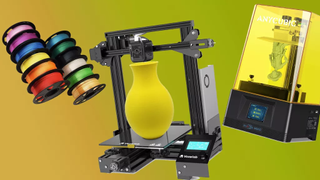
Master the Art of 3D Printing with the Powerful Anycubic Kobra Max - Expert Review Inside
The Anycubic Kobra 2 Max is a massive improvement over its predecessor, but suffers from being overhyped and underdeveloped. It can print quite well, but its speed is overstated by Anycubic, which claims it can push plastic at 500mm/s. It cannot. What it can do is a very brisk 150 to 230mm/s, which for the build size is amazing.
Our test printer had a rough start, having arrived with buggy firmware and a slightly wonky bed that dips down in the lower left corner. Unfortunately, there’s no manual leveling to correct this – only the sensors – so I ended up shimming the bed with a few Post It notes.
It’s also troubling that Anycubic is silent on how the entire Kobra 2 lineup has unlocked its new speed. It looks suspiciously like Klipper – complete with built-in resonance testing. However, the firmware is inaccessible and no Klipper-like controls are offered on the menu or control screen. The printer does offer Wi-Fi connectivity, but only if you use the Anycubic slicer and mobile app.
Like the first Kobra Max, this machine is freaking huge. With a big 420 x 420 x 500 build volume, this Max is great for cosplay props like helmets and perhaps whole shields. But first, you’ll want to measure your workspace and account for the THREE SQUARE FEET of operating space it requires. I had to turn the printer sideways to fit on my IKEA counter – and the spool holder still hung off into space.
LATEST VIDEOS FROM tomshardware Tom’s Hardware
I would still recommend the Anycubic Kobra 2 Max over the previousKobra Max for the increase in speed and the more forgiving flexible built surface. Despite its flaws, it worked well on most materials once I got past the early firmware issues and figured out my own (slower) speed settings. The bed leveling issues and lack of fast profiles in the printer’s own custom slicer prevents me from putting it on the list ofbest 3D printers .
Specifications: Anycubic Kobra 2 Max
Swipe to scroll horizontally
| Build Volume | 420 x 420 x 500mm (16.5 x 16.5 x 19.7 inches) |
|---|---|
| Material | PLA/PETG/ABS/TPU (up to 260 degrees) |
| Extruder Type | Direct Drive |
| Nozzle | .4mm Proprietary High Flow |
| Build Platform | Textured PEI steel flex plate, heated |
| Bed Leveling | Automatic + Z height |
| Filament Runout Sensor | Yes |
| Connectivity | USB & Wi-Fi through the app |
| Interface | Color Touch Screen |
| Machine Footprint | 735 x 640 x 740 mm (28.9x25.1 x 29.1inches) |
| Machine Weight | 21 KG (46.3 lbs) |

Included in the box: Anycubic Kobra 2 Max
.png) Kanto Player Professional
Kanto Player Professional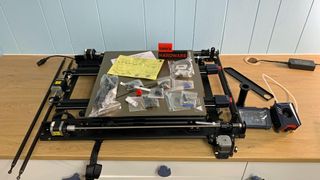
(Image credit: Tom’s Hardware)
The Anycubic Kobra 2 Max comes with everything you need to get started: tools to build and maintain the printer, grease and a USB stick. You also get a spare nozzle and small sample of PLA.
There’s a paper copy of the quick start guide to help you build the printer. The printer has sample models in the memory, and the UBB card has a PDF copy of the manual, Anycubic Slicer and a profile for PLA to get you started.
Assembling the Anycubic Kobra 2 Max
(Image credit: Tom’s Hardware)
Despite the size, the Kobra 2 Max is easy to assemble. It ships mostly assembled in two large sections and only needs a handful of screws and bolts to assemble. Four bolts hold the gantry in place, then a brace is attached from the top of the machine to the back. A few more screws attach the touch screen, while the spool holder snaps onto the base.
Please note, the Kobra 2 Max has two Y axis belts. You’ll want to make sure each belt has about the same amount of tension for smooth printing. It takes about 30 minutes to carefully assemble.

Leveling the Anycubic Kobra 2 Max
 Power Tools add-on for Google Sheets, 12-month subscription
(Image credit: Tom’s Hardware)
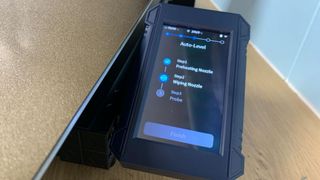
The Anycubic Kobra 2 Max has the same bed leveling sensors as theKobra 2, which not only levels the bed but also set the Z height. There are no knobs for manual tramming, leaving everything to the automatic sensor. If the Z height is not perfect – and our machine was low in the lower left corner – you don’t have much recourse. I had to shim the bed with a few Post It Notes to get the entire bed level.
To level the bed, select Control → Auto-level. The machine will home itself, preheat and then double tap 49 spots in a grid across the bed surface.
Loading Filament in the Anycubic Kobra 2 Max
To load filament, press Prepare on the main menu. Select Filament. Now select Filament In or Filament Remove. The machine will now heat up to 230 C, taking about 60 seconds. Put your spool on the spool holder, and place the end of the filament into the runout sensor. Press Filament In and wait for the filament to be pulled to the extruder, or pinch the tension release on the front of the extruder and push it through by hand. Press Stop when the filament is coiling below the hotend.
Removing the filament works the same, just in reverse. Let the hotend preheat, select Filament Remove and let the gears back the filament out. Feel free to manually pull the filament out of the Bowden tube as soon as it’s left the hotend.
 Video Converter Factory Pro
Design of the Anycubic Kobra 2 Max
(Image credit: Tom’s Hardware)
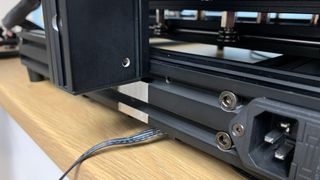
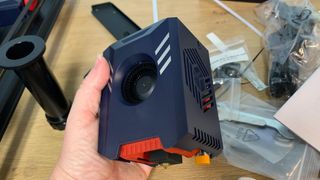
The Anycubic Kobra 2 Max looks very similar to the Kobra 2, with a better front-mounted blower that’s become a design feature on the hotend. Noticeable improvements over the previous model are a metal PEI flexplate for easy print removal and a direct drive.
The bed is hard-mounted, which is unfortunate because our test printer arrived with a warped print surface. I was able to shim it with a few sheets of paper, but it’s very disappointing to resort to hacks on a new printer. The bed leveling system is very promising, as it’s added the ability to set its own Z height with the help of a sensor in the back corner.
The Kobra 2 Max has an antenna for Wi-Fi, but it can only be used with the Anycubic slicer and app. I could not connect to the printer over my LAN network, which was again, disappointing.
The printer is very large, and like many of the new wave of “max” printers, it won’t fit on a standard counter. You’ll want to measure your space first and ideally build it in place. The printer is 43 pounds and difficult to get through doors with the side-mounted spool holder attached.
The Kobra Max 2 may be a “bed slinger” but it’s built for stability. It has dual Z rods synced up with a belt, two widely-spaced Y axis rods and braces that hold the gantry steady. It has silent stepper motors, but you will still hear the fans. It’s not nearly as noisy as some of the Klipper machines we’re getting now, but it’s not a printer for people easily annoyed by white noise.
Another underwhelming change is the move from a common E3D style Volcano nozzle to a proprietary high flow that is almost, but not quite similar. This means you can’t experiment with 3rd party nozzles that may have better flow. The nozzle can get up to 260 C, hot enough for most consumer grade materials. The bed can reach temperatures of 90 C, so I would not plan on enclosing this for printing nylon or ABS.
The touch screen is the same 4.3-inch display Anycubic has used for the last several years. The menu is still very easy to navigate for beginners, with options in logical locations.
Preparing Files / Software
 vMix Basic HD - Software based live production. vMix Basic HD includes 4 inputs, 3 cameras, streaming, recording, playlist.
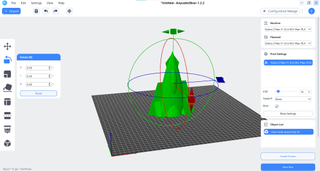
(Image credit: Tom’s Hardware)
The Anycubic Kobra 2 Max comes with a copy of Anycubic Slicer, which is based off Prusa Slicer. Despite being a brand new slicer made by Anycubic, the one printing profile was included separately and needed to be installed myself.
Anycubic has recently launched a mobile app to accompany their printers, but I did not find it very useful. Without a camera or the ability to change the printer’s settings, all it can do is announce prints are done. Anycubic is still working on the app, and claims you will soon have more control, the ability to monitor prints and slice models from your phone.
Printing with the Anycubic Kobra 2 Max
Big printers mean big prints, so knowing where to get thebest filaments for 3D printing is essential. The Kobra 2 Max only came with a sample coil, so you’ll want to stock up immediately.
Of course, you don’t have to print large items with the Kobra 2 Max. It’s still a regular 3D printer – and it can really kick things into high gear for small prints. It was able to produce a very respectable 18 minute and 4- second speed benchy using Speed Boat Rules (2 walls, 3 top and bottom layers, 10% grid infill, a .25 layer height and .5 layer width). The bow was a bit wavy and the layers uneven, but it’s still in the top ten of our3D printer speed hierarchy and on par with the speed of aBambu A1 Mini .
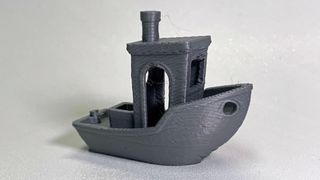
3D Benchy (Image credit: Tom’s Hardware)
All that build plate was begging for something huge to print, so I printed a giant rubber duck out of PLA – if you have kids, you’ll understand weird requests. This is when I learned that speed and large prints do not mix, as it layer-shifted (see how toavoid layer shifting on your 3D prints ) after getting over a kilo of PLA on the bed. I slowed down the overly optimistic travel speeds and got a fairly decent print if you don’t look too hard at the Z seam, which is still a mess.
Everywhere else, the print is clean. The little duck (at 100%) took 1 hour and 35 minutes, while the big duck (at 400% and 425mm tall), 22 hours and 43 minutes. Both were printed at 230 mm/s with .28 layer height and lightning infill. The failed print ate into my supply ofInland Yellow Pla+ , so we switched to Printerior orange halfway through.
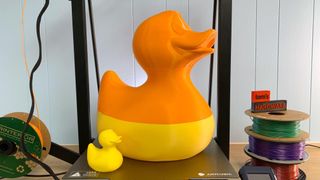
Rubber Duck by Chr5500 (Image credit: Tom’s Hardware)
Next up was a practical print: a clip for a bike air pump. This was made in Tinkercad to custom fit the bike frame and the size of the pump. The print turned out wonderfully smooth with no stringing. 42 minutes and 12 seconds, at a .2 layer height and 230 mm/s. I printed it inGreengate recycled Purple Reign PETG.
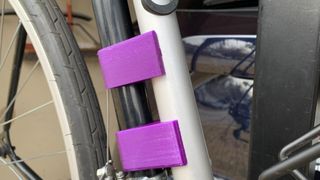
PETG air pump holder, Made with Tinkercad (Image credit: Tom’s Hardware)
TPU was less successful. On this vase mode print, it started off very smooth and clear, but then started to under extrude as the layers took less time to complete. This was printed at a 100 mm/s speed using a .28 layer height, and took 1 hour and 37 minutes to print.
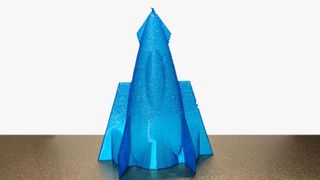
Vase Mode Ship , by LJ Prints (Image credit: Tom’s Hardware)
Bottom Line
The Anycubic Kobra 2 Max is a massive machine reasonably priced at $569 and currently on sale for $519. It’s a good fit for prop makers and cosplayers who want to make large costume pieces without needing to slice up their printers. You do have to be in the mood to tinker with the slicer to get the best balance of speed and precision.
It’s a big improvement over the previous Kobra Max, and much faster, even if it’s not wise to go pedal to the metal. The PEI bed sheet and Z height sensor are welcome additions.
However, the whole printer feels rushed to the market, especially as I had to hold on to this review for a couple months while Anycubic addressed a fatal firmware flaw in the early version. Even with the wait, it still lacks any notable features in the promised app and the slicer feels second hand at best.
If you want a massive printer that works great out of the box, theElegoo Neptune 3 Max is still your best bet, and quite a steal at $409. It remains ourEditor’s choice for large format printers.
- Title: Unveiling Gadgets with Tom - Expert Hardware Reviews
- Author: George
- Created at : 2024-08-19 03:16:37
- Updated at : 2024-08-20 03:16:37
- Link: https://hardware-tips.techidaily.com/unveiling-gadgets-with-tom-expert-hardware-reviews/
- License: This work is licensed under CC BY-NC-SA 4.0.